STROKE + FILLOne of the more fun features is, of course, adding color to the things you've drawn.
|
||||||||
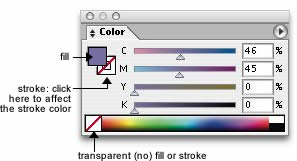
The color palette allows you to mix fill and stroke colors using several systems: CMYK, RGB, greyscale, and HSB (hue, saturation, brightness). To the left are two boxes representing fill (the solid one) and stroke (the hollow one). Click on the one you want to change before using the sliders to select your color. You can also just click in the spectrum below to select a color (and use the sliders to modify it). Transparent fills/strokes are achieved selecting the box with the red stripe through it (at bottom left). Solid black and opaque white are selected using the smaller boxes to the right of the spectrum.
|
|
|||||||
Stroke Weight: Type a point size in this box to make the edge of your
object thick or thin, or use the up and down arrows. |
|
|||||||
There is also the opportunity to make a color semi-transparent
so that other colors can There are also transparency modes that affect how the colors blend.
|
||||||||
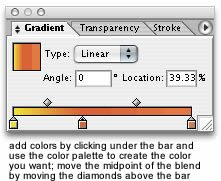
GRADIENTSA gradient is when a fill moves from one color to another. Gradients can contain multiple colors, as you determine and design them. Along with the palettes for color and stroke, you will find a very simple gradient design palette. You can have as many colors in a gradient as you want; each box, under the bar at the bottom of the window, represents a place to change color. Click under the bar to add more boxes. Each box represents another color.You can move them along the bar, which determines the starting point of each color transition. The diamond shapes above the bar indicate the midpoint of the transition. You can move these anywhere along the bar as well. Note that you can make gradients move along in a linear fashion, or work concentrically from a center point (radial). Save the gradient by clicking on the swatch in the gradient panel, and dragging it to your swatches panel. If you forget to save a gradient, you can always use your eyedropper tool to recreate it.
|
|
|||||||
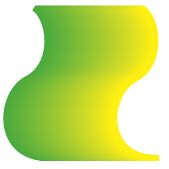
A blend, on the other hand, is a series of objects that transform from one shape to another, or from one color to another. While you can create blends that look similar to gradients, a blend offers you a lot more flexibility in terms of the way the colors move - you have more options with blends than "linear" and "radial." This blend was created by simply drawing two lines and assigning them different stroke colors. Use the blend tool to click on the endpoint of one stroke, then the endpoint of the second stroke.
|
|
|||||||
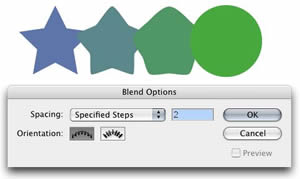
You can also blend shapes. Start with two shapes—they can have the same fill color or two different ones. Choose Object -> blend -> blend options. Note in the dialog box, the spacing has been changed from "smooth color" (above) to specified steps. In either case, the "orientation" of the blend can either be parallel to the original shapes (the slanty one), or parallel to the page (the straight one). Close the dialog box and, with the blend tool, click on one point on each object to create the blend.
|
|
|||||||
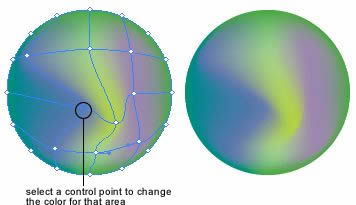
Illustrator also has an interesting feature called “gradient mesh” which combines colors in gradient form, but within a more complex set of boundaries. To create a gradient mesh, draw your object and then use Object -> create gradient mesh to specify your parameters. You can also use the gradient mesh tool to add colors to various portions of the gradient: click on a control point and use the color palette to change the color that will radiate from that point. |
|
|||||||
|
||||||||